 FA+
FA+
10794
Views
Views
110
Favorites
Favorites
Category
All / All
Species Unspecified / Any
Gender Any
Size 1182 x 808
File Size 164 kB
More from Soldawn


So I have been getting a lot of questions on how to make a profile picture. I decided to create a tutorial in order to help.
Follow the steps below:
1. Go to https://redketchup.io/image-resizer
2. Select (Browse…) and pick the desired profile picture
3. Hover your mouse above the upper left corner of the desired crop area and then hold down the left mouse button
4. While holding down the left mouse button, drag the pointer to the bottom right of the desired crop area and then let up on the left mouse button
Tip: If you do not like how the selected area is centered, hover in the center of the selected area and a cross will show up. Once the cross shows up, left click and then move the selected crop anywhere you want and then release the left mouse button.
5. Below (Crop Dimensions) you will see two boxes labeled Width and Height. Make sure these two boxes are filled with equal values and make sure that the selection area still covers the desired cropping area
6. Below (Resize Dimensions) you will see two more boxes labeled Width and Height. Set Width to 100 and Height to 100.
7. In the (Save Image) box set Export As=PNG – Portable Network Graphics, Effect=Sharpen, Sharpening=Hight, Color Depth=32-bit.
Note: You can also play around with these settings to get the results you may want, we just set the file type to PNG in order to avoid profile photo quality loss on FA.
8. To the right of (File Name) give the profile picture a desired name. Once satisfied click (Save Image).
9. A new window will open and you will click the download icon.
10. Enjoy!
luv you cuties <3
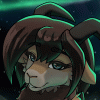
Artwork by: TheLoneDragon
Follow the steps below:
1. Go to https://redketchup.io/image-resizer
2. Select (Browse…) and pick the desired profile picture
3. Hover your mouse above the upper left corner of the desired crop area and then hold down the left mouse button
4. While holding down the left mouse button, drag the pointer to the bottom right of the desired crop area and then let up on the left mouse button
Tip: If you do not like how the selected area is centered, hover in the center of the selected area and a cross will show up. Once the cross shows up, left click and then move the selected crop anywhere you want and then release the left mouse button.
5. Below (Crop Dimensions) you will see two boxes labeled Width and Height. Make sure these two boxes are filled with equal values and make sure that the selection area still covers the desired cropping area
6. Below (Resize Dimensions) you will see two more boxes labeled Width and Height. Set Width to 100 and Height to 100.
7. In the (Save Image) box set Export As=PNG – Portable Network Graphics, Effect=Sharpen, Sharpening=Hight, Color Depth=32-bit.
Note: You can also play around with these settings to get the results you may want, we just set the file type to PNG in order to avoid profile photo quality loss on FA.
8. To the right of (File Name) give the profile picture a desired name. Once satisfied click (Save Image).
9. A new window will open and you will click the download icon.
10. Enjoy!
luv you cuties <3
Artwork by: TheLoneDragon
Category All / All
Species Unspecified / Any
Gender Any
Size 1182 x 808px
File Size 164 kB


Comments